Magnolia Bud Card

Last night I had my Stamp in the New Catalog event.  It was a lot of fun!  For a while it was a little crazy, helping several people at once, but that's the nature of the game.  Seven people attended the event.  Well, actually 6, since one had to work, so her mom stamped everything and brought the rest back so she could put the cards together herself.  


Card #1

So Saffron Magnolia Buds.  It looks a little bit simple with all the white spade on the card, but there is actually a lot going on.

The buds are colored using both the So Saffron Stampin' Blends markers and the light Old Olive Stampin' Blends.  They aren't perfectly colored this time.  I started out using the dark and making swoosh lines out into the center of the card.  Then repeat the same with the light to fill in the remainder.  I actually really like how it came out.

The two pieces of paper are added to ground the card.  The So Saffron piece is embossed with the Layered Leaves embossing folder and the smaller piece is from the Magnolia Lane DSP.  

The card was a little too white, so I sponged some So Saffron in the middle of the card.  

Add a bow made from the Linen Thread, an Old Olive leaf, and some Rhinestones and call it complete.  Just like my club people, I spoiled these ladies.  I pre-made the Linen Thread bows for them.  It was either do them ahead of time, or probably end up doing most during the event.  It was a little thing, but boy, did they appreciate having the bows done for them!

When looking at the colors this way, they definately would make for a beautiful Autumn card.  But, not this card!

Hope you enjoyed the card.  Click on the above picture for dimensions and instructions.

Until next time...Stampin' Always,

Cheryl, HomeStyle Stamper

Product List


Big Shot
Big Shot


Don't Forget...

I've been busy getting ready for my Stamp in the New Catalog party tonight.  We are making 4 different cards using the Good Morning Magnolia stamp set.  Starting tomorrow, I'll start posting them here.  I hate to spoil the surprise for those coming!

Hope you haven't forgotten the two specials Stampin' Up! has going on now.

Gotta love these Bonus Days!  Spend $50 in product and receive a code to use on your order in August that is worth $5!  And there is no limit to how many codes you can receive. You have until July 31 to collect the codes. They will come via email, possible multiple emails so keep track of those!

Thinking of joining me and becoming a demonstrator?  Now through August 31, sign up for $99 and you get to spend an additional $30 to put towards your personalized Starter Kit.  That's right, you get to pick out $155 in product of your choice.  And you will get a coupon worth $10 to spend the next month.  So, that's actually $165 in product for only $99.  It's a great time to get started.  Christmas is coming up and you can benefit from the discounts demonstrators receive.

Have any other questions?  Don't hesitate to contact me.  I'd love to chat with you and answer any questions.

Until next time...Stampin' Always,

Cheryl, HomeStyle Stamper

Masculine Thank You Card

It's another hot and humid day summer.   This is the worst part of summer.  My husbands loves it and is infact outside tearing off our deck to build another one.  Good for him because I'm staying in the air-conditioning as much as possible.

I made this Thank You card for our head manager when the store closed.  Several people had nominated me to make a card for the two managers.  I couldn't say no.

The DSP is the Come Sail Away DSP pack.  It's not just for sailing.  I chose two prints that were neutral in print and it works out great.  The two pieces are matted in Balmy Blue.  Definately stands out against the Night of Navy.

Being it was going to a male, I couldn't do the normal bling up, but it needed something.  I wrapped silver thread around the saying pieces and it was exactly what the card needed.  Some detail, but no bling.  Don't forget to use dimensionals on this piece!

I felt the Night of Navy cardstock was just a little too bland.  I took the dot stamp from the Waterfront stamp set and Night of Navy ink pad and stamped some of the dots on the cardfront.  It's a subtle detail, but I didn't want to take away from the rest of the card either. 

There is another Thank You card I'll show next time.  Same stamp set, but definately feminine.

Click on the above picture for dimensions and instructions.

Until next time...Stampin' Always,

Cheryl, HomeStyle Stamper

 tams# 34884

Product List


All Things Thanks Clear-Mount Stamp Set


Tasty Thursday - Strawberry Shortcake Dessert

Happy 4th of July

We didn't do anything special today.  The girls both binge watched Stranger Things on Netflix.  They watched 8 hours worth today.  Crazy right?  I watched the first episode and I was done.  I definately couldn't watch that many at one time.  Overload.

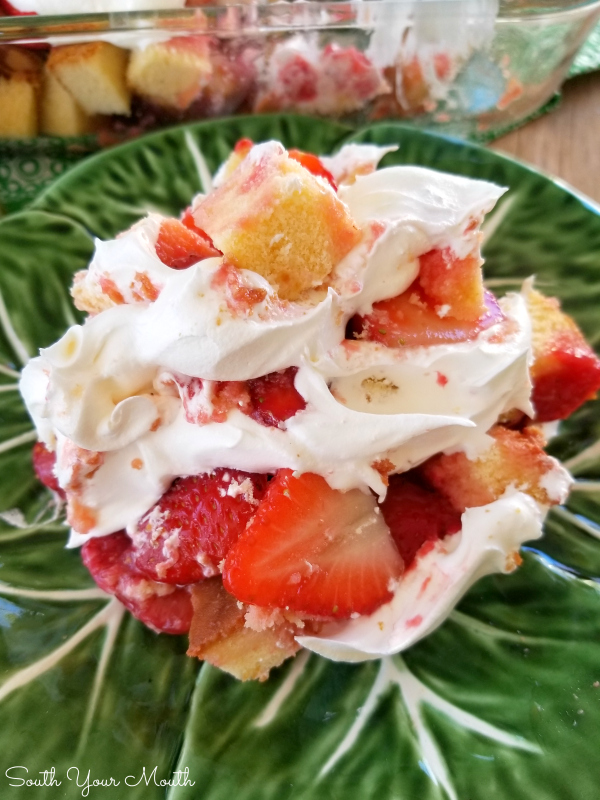
We had Chris' parents over last night for dinner.  I was going to make strawberry shortcake for dessert, but wasn't totally in the mood.  Pinterest to the rescue!  I found this other dessert which was basically a deconstructed strawberry shortcake, but better.  Take a look.

Strawberry Shortcake Dessert! An easy recipe for a Strawberry Shortcake layered dessert made in a 13x9 dish perfect for potluck dinners, cookouts or family gatherings!

Strawberry Shortcake Dessert

INGREDIENTS

  • 1 16-oz carton fresh strawberries
  • 1 tablespoon sugar
  • 1 1-lb prepared pound cake
  • 3 16-oz tubs frozen sliced strawberries in sugar
  • 1 12-oz tub cool whip

INSTRUCTIONS

  1. Thaw frozen sliced strawberries (which I will refer to as ‘strawberry sauce’ throughout the rest of the recipe so not to confuse them with the fresh strawberries), cool whip and pound cake (if applicable).
  2. Wash, trim and slice fresh strawberries then combine with sugar in a small bowl. Cover and rest at room temperature for 10-15 minutes.
  3. Spread one container of the strawberry sauce (thawed sliced strawberries in sugar) in the bottom of a 3-quart 13x9 dish.
  4. Cut pound cake into small cubes then arrange half of the cake pieces on top of the strawberry sauce. Top cake pieces with half of the fresh strawberries and the second container of strawberry sauce.
  5. Arrange the remaining cake pieces and fresh strawberries over the contents of the dish then top with the third container of strawberry sauce.
  6. Top mixture with cool whip then refrigerate until ready to serve. Serve within 24 hours of preparing for best results.

The mix of frozen vs. fresh strawberries was pretty nice.  The frozen provided much more juice which the pound cake soaked up nicely.  I put it together just a few hours before service for that reason.  

Everyone loved the dessert. Here is where I found the recipe:  https://www.southyourmouth.com/2019/01/strawberry-shortcake-dessert.html

There was plenty of leftovers and that's a bonus in this household.

Until next time...Stampin' Always,

Cheryl, HomeStyle Stamper

Extra Extra

Stampin' Up! is full of surprises.  If you are interested in becoming a Stampin' Up! demonstrator, take a look at this!

If anyone signs up to become a demonstrator between July 1 and August 31, 2019,  they will receive a bonus of $30 extra dollars.  That's right,  You pay the normal $99 for the Starter Kit and choose $155 worth of any Stampin' Up! product.  

Plus...you will receive a bonus code so you have an additonal $10 spend through October 31, 2019.

No one can deny this is a pretty good deal. 

The Starter Kit is the best thing ever.  It will contain absolutely anything you want from the catalog.  You choose $155 of absolutely anything you want.  Talk about Christmas in July!  

I'd love to chat with you about becoming a demonstrator.  Since I don't have my regular job any more, I have plenty of time to chat!!

Until next time...Stampin' Always,

Cheryl, HomeStyle Stamper

Bonus Days are here!

So, what does this mean to you?

For every $50 spent in July, you earn $5 to spend in August.  So, here's the scoop:

  • The order must be $5o before shipping and handling
  • Every order MUST include a valid email
  • There is no limit to the number of codes you can earn
  • All codes will be sent via email
  • Deadline to earn Bonus Codes is July 31 11:50 MT
  • If you place multiple eligible orders, you will receive multiple emails containing the Bonus Codes
  • VERY IMPORTANT  Make sure you keep these emails containing the codes

The codes can be redeemed any in August on any any product.  Copy and paste the codes in the "Manage Coupon Codes" box online and it will automtically take off $5 per code.  You an use multiple codes during one order.  Codes can be used only one time.  MUST be used by August 31.  

This is a great time to stock up on those basic supplies like cardstock or envelopes.  Or, work on that Wish List you made from the new Annual Catalog.  No product is excluded during the Bonus Days.

I'm here if you have any questions.  

Until next time...Stampin' Always,

Cheryl  


Simple In-Color Card

What a weekend.  The four of us went to the Brewer's game last night.  It was super hot in the parking lot.  Thankfully, the game itself was in the shade and ended up being a beautiful night for a ball game.  AND we won!!

Today, my husband and I went to a flea market.  Super hot.  I did not enjoy that part.  Storms were coming in and we were getting ready to leave.  All of a sudden the winds came up and things were flying all around.  Table turned over, tarps went flying, glass was breaking.  I wouldn't have been surprised if it ended up being a small tornado.  We were glad to get out of there.

Want to see the new 2019-2021 In-Colors?  Here they are and all in one card!

I made this simple card for my club thank you's.  I used the Stitched Rectangle Dies.  The dies made the card even easier to make and added the stitched detail along the side.  Perfect.


Product List


Don't you just love these colors?  I'm thinking Seaside Spray is my favorite right now, but gosh, Pretty Peacock is gorgeous too.  Don't forget that you can order these colors all in a single pack.  You get 4 sheets of each color.  I start out ordering the new cardstock this way every year.  Once I see and use the colors, I decide what colors I want to order the individual cardstock packs. I am on a budget too, so this is perfect.  Click here to check out the 2019-2021 In-Color Cardstock .

Click on the above picture for dimensions and instructions.

Until next time...Stampin' Always,

Cheryl, HomeStyle Stamper

tams# 34787

Product List


Mosaic Mood Swap Card

Wow, it's hard to believe that it's already Friday.  My first week of no job and it flew by.  But, it does just seem like I'm on vacation.  It'll probably hit more in the next week or two.
The travelling peach truck came around this week and I got a box of Georgia Peaches.  YUM!  They are  now just getting ripe, so today  I made a peach cobbler and a peach coffee cake for tomorrow morning.  This was on top of also making peach jam.  I've never made this kind so we will see how it turn out.  

Yesterday, Megan and I went strawberry picking.  OMG They are so good.   I think we made about 7 recipes of freezer jam.  It's so bad for you with all the sugar, but it tastes so good.  My family absolutely loves it.  I also made a strawberry syrup and strawberry lemonade.  

Yikes,  I need a break.


I still haven't had time to get in my stamp room.  It's crazy.  I miss being down there in my own little world.  I think Monday will be my day to take off and spend down there.  

So, here is another swap card using the Mosaic Mood Speciality DSP.  Paper definately looks better in person than in the catalog.  Take a look at what patterns are included in this pack.


I'm not sure what the stamp sentiment is from.  The only requirements was that everything in the swap had to be current.  So, we know it's not from a retired stamp set.  Wish I could be more help with that.  

Until next time...Stampin' Always,

Cheryl, HomeStyle Stamper