Sale-A-Bration Time!

For Stampin' Up! it's "The Most Wonderful Time of the Year!"

So, I'll give you all the details.  

For every $50 or $s100 you spend, you can earn FREE products.  Yup, that's right.  There's a whole brochure that contains all the items you can earn for free.  Stampin' Up! has included stamp sets, punches, dies, paper, card kits and even embellishments.  There's a huge assortment for you to chose from.  

There is absolutely no limit to the number of free items you can earn.  For every order that is in the increment of $50, you can earn another product.  So, in other words, if you order $100 in product, you can get TWO $50  items.  Keep going to $150, and you just earned three $50 items.  But be careful. There are a few items that are free with a $100 order.  Watch the color of the starbursts to see if the item is free with a $50 order or a $100 order.

There is also NO limit to the number of free products you earn.  No matter the what the total of a single order or how many orders are placed during this time, the sky's the limit!

If you want to look at the brochure, click on the catalog image on the right side of my blog.  It'll take you right there.

It's also time for a new Mini Catalog!  Aren't those poppies on the front just crazy cute?  Put away those fall and Christmas stamp set.  Tired of those winter scenes?  There are plenty of Spring stamp sets to get you re-energizied.

I've already played with the stamp sets I was able to pre-order.  They are going to be so fun to play with.  I actually broke down and ordered the Parisian Blossom Suite!  Click Here to see what is all included.  Never have I done that, but it was something that was calling me. 

There are so many goodies to get us through the first part of the year.  You can shop for Valentine's Day, Easter, Mother's Day and Father's day, the Mini Catalog has it all.  There are plenty of new bundles, punches, dies and so much more to choose from.  My Wish List is way too long.  I did manage to stay within in my budget and some of my Wish List will just have to wait.  

Need a copy of the brochure?  Or a copy of the new Mini Catalog?  Contact me!  I can get one out to you right away, along with the Sale-A-Bration catalog.

Until next time...Stammpin' Always,

Cheryl, HomeStyle Stamper


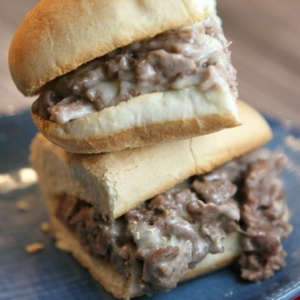
Tasty Thursday - Philly Cheese Steak Sandwiches

How often do you need a quick and simple dinner idea?  Way too often is my guess.  

When I first tried this recipe, my husband was kind of skeptical.  But that's his nature so I didn't think anything about it.  

For this recipe, you need thinly sliced beef.  You can slice it yourself.  But, look again in your grocery meat department.  Pick 'n Save, a Kroger owned store, you can purchase meat that is already sliced so thin, you can almost see through it.  Yes, that's right.  It's awesome!  This helps make a quick meal even quicker.  No cutting and faster cooking!  Works for me!  Check with your local meat butcher if they have something like this, or maybe they can slice the meat for you.

If I don't purchae this meat, I buy another kind and light shave it with my knife.  The recipe does have specific way of slicing the beef, but I do my own.  It's usually faster and easier.  But you be the judge of what works for you.

Philly Cheese Steak Sandwiches

  • 2 pounds skirt steak (don't sub any other kind!)
  • Four 8-inch soft Italian sub rolls
  • 2 tablespoons vegetable or canola oil
  • 1/2 teaspoon salt
  • 1/8 teaspoon ground pepper
  • 1/4 cup grated Parmesan cheese
  • 8 slices (8 ounces) American cheese
  1. Trim fat from steak, if needed. Slice the steak crosswise, with grain, into 3-inch-wide strips. Place steak on large plate and freeze until very firm, about 1 hour. Using a sharp knife, shave the frozen steak as thinly as possible against the grain. Mound the meat on a cutting board and chop coarsely with your knife, 10 to 20 times.

  2. Adjust the oven rack to the middle position and heat oven to 400 degrees. Split rolls open, spread on baking sheet, and toast until lightly browned, 5 to 10 minutes.

  3. Heat 1 tablespoon oil in 12-inch nonstick skillet over high heat until just smoking. Add half of the meat in an even layer and cook, without stirring, until well-browned, 4 to 5 minutes. Stir and continue to cook until the meat is no longer pink, 1 to 2 minutes; transfer the meat to a colander to drain. Wipe out the skillet with paper towels and repeat with the remaining 1 tablespoon oil and chopped meat.

  4. Return the now-empty skillet to medium heat. Drain the excess moisture from the meat, return the meat to the skillet, and add 1/2 teaspoon salt and 1/8 teaspoon pepper. Cook, stirring constantly, until meat is warmed through, 1 to 2 minutes.

  5. Reduce heat to low, sprinkle with Parmesan, and lay American cheese over the top Let cheeses melt, about 2 minutes. Fold the melted cheese into the meat thoroughly. Divide the mixture evenly among the toasted rolls and serve.


I will admit this... I don't always do the onions.  More importantly, my husband doesn't even miss them and he loves onions.  I also add some minced garlic.  Being Italian, I add it to just about everything.  

I found the recipe at recipegirl.com.  You can click here if you want to see her post.

Until next time...Stampin' Always,

Cheryl, HomeStyle Stamper


Merci Eiffel Tower

Image result for happy new year 2020

HAPPY NEW YEAR!!

It's still hard to believe that the new year is now here.  My 2019 was fairly good.  The girls both came home from Europe safe and sound.  We all all in good health.  My husband and I celebrated our 25th wedding anniversary!  That alone is a major event.  Thankful for having our families love and support us.

The saddest part was Shopko closing.  I still miss my Shopko family, but they are still scattered around the area.  We all had to move on and that's what we are doing.  New opportunities have come up for all of us.


I saw an idea using this layout on Pinterest and tweaked it to my taste. 

To me, I think of light blue and black are Parisian colors.  Not sure if that is really true, but I went with it.  I chose Balmy Blue and Basic Black for this card.

The Eiffel Tower is not stamped.  It is just cut out from the Parisian dies.  The first time I ran it through the Big Shot, all the tiny pieces were still stuck.   I ran it through again, this time paper side up and it worked great.  I have tiny pieces of Balmy Blue everywhere!  

The adhering of the Eiffel Tower was probably the worst.  I used the Multipurpose Glue and put super tiny dots all over the back where ever I could.  I then used the largest stamp block and rest it over the card for a few minutes while the glue dries.  Worked perfectly.  I did the same for the Merci.

When cutting out the Merci, there is a dot for the i.  I saved myself the aggrevation since it was so small, and used a rhinestone instead.  My motto...A little bling is a good thing.

Notice the swirls on the Basic Black.  It's the new Parisian Flourish Embossing Folder!  Love it!  The Basic Black was a little too basic for my taste.  It needed a little pizzazz.  

The only stamped image is the fleur de lis.  I was going to fussy cut it when I noticed there was a die for it!  Score!  Simple cards can have flair, not always bland.

Let's hope for an awesome 2020!

Click on the above picture for dimension and instructions.

Until next time...Stampin' Always,

Cheryl, HomeStyle Stamper

Product List


Amore Fleur De Lis

Today was my day not to leave the house.  I got a whole bunch of stuff done, including going in my stamp room!  Some cleaning had to be done.  After the frenzy of making Christmas cards, my room was a disaster. Now, is a lesser of a disaster.  Shouldn't a craft room always be a work in progress? 

Brought out the new Parisian Beauty Stamp Set.  Of course, there is an image of the Eiffel Tower that most people would probably use first.  Not me!  Let's go for the fleur de lis instead

Let's use the fleur de lis instead.  The three fit perfectly in a piece that is 1 x 4 inches.  I recommend stamping the middle image first.  Then you can judge how much room you have left between the image and the end of the paper.  

It's a new piece of DSP too.  It's from the Birthday Bonanza DSP.  Never would have guess that right?  The other side has animals on, but I love this side. It's more me I guess you can say.  The colors used are Coastal Cabana and Bermuda Bay.  It was good use use the colors again. 

With Christmas over, it's time to get out all those other colors!  This is my favorite time of stamping.  The only holiday coming up is Valentine's Day.  Otherwise, it's a free-for-all with stamping!  Yay!

Click on the above picture for dimensions and instructions.

Until next time...Stampin' Always,

Cheryl, HomeStyle Stamper

Product List


The Cherry Blossoms are coming in January!

After a short break for the holidays, I'm back!  It was a good Christmas holiday.  It's sad that all the prep that goes into Christmas is over with so fast.  We still have the Christmas tree up and I'm thinking by the weekend it will be down and my house will be back to normal.

I finally got time to get into my stamp room.  I played with the new Cherry Blossoms Stamp Set that is coming out in the next Mini Catalog.  It goes live on January 3rd.  

The cherry blossom is stamped in Memento Ink and colored with the So Saffron and Old Olive Stampin' Blends.  You will be super happy to hear this stamp set comes with a set of dies!  No fussy cutting this one out!  

I really don't know what to call the Old Olive pieces, but budding leaves.  They were cut out from the Pereinnial Essence Vellum Cardstock.  It was a much different approach than typical cardstock.  To adhere them, I actually used Washi Tape.  Yup, just tape those to the back of the cherry blossom.  So much easier than using any kind of glue.

It was great  being in my stamp room and using new stamps!  Have you looked at the new Mini Catalog?  I'm excited for it to go live so everyone can order from it.  

Don't forget, SAB also starts January 3rd!  Get your Wish List ready, and don't forget the FREE items you can earn.   Meanwhile,  you are still able to order from the Retirement List.  That will end, along with the Holiday Mini Catalog, on January 2nd. 

Contact me if you need any catalogs!  I have some spares to send out.

Click on the above picture for dimensions and instructions.

Until next time...Stampin' Always,

Cheryl, HomeStyle Stamper

 tams# 39923

Product List


Hand Sanitizer Mini Gift

My friend stopped over yesterday with a little treat.  It wasn't anything big, but still was competely adorable.

Isn't this wonderful!  Can you see the hand sanitizer hiding behind the tree?    

I don't have any dimensions to pass onto you.   The base is just a simple box.  The trees are adhered to the box and the tops together.  Add a bow and some puffy paint.  And don't forget that moose!  He will be back next year!  

Wouldn't you be happy to receive this little gift?  It sure made me happy.  

Until next time...Stampin' Always,

Cheryl, HomeStyle Stamper


Christmas Trees are not just for Cards!

Most people thing of Stampin' Up! with stamping and card making supplies.  What people don't always remember is that  these products can also be used for home decor too.  I've even seen wreaths made from DSP and they are gorgeous.

When I go antiquing, the wooden items draw my attention.  Especially old wooden drawers or boxes.  Everyone has their things to collect.  I bought two of these drawers and didn't exactly know what I was going to do with them, but they were inexpensive and eventually I would find a use for them.  

This is a card I designed using the Perfectly Plaid Stamp Set and Wrapped in Plaid DSP.   It's a simple design and sometimes those make the biggest statements.  I took this card adjusted the measurements and made this picture.

I am in LOVE!  The drawer typically sits flat, but  in order to get a picture with less shadow, I had to tip it just a little.  It was so super easy to re-create.  I just had to adjust the measurements to fit inside the drawer and everything else is the same.  The picture just rests inside the drawer.  It's not adhered so I can take it out and replace it with something else.  I'm thinking I will try to make something for the holidays or seasons.  That would be so fun!

My friend thought I was a little crazy buying these drawers, there are actually two.   She now wants to start looking for drawers at antique stores herself.

Until next time...Stampin' Always,

Cheryl, HomeStyle Stamper

Moose Christmas

I received this card from my friend and I just had to share it.  

Now, how can you not love this adorable card?  The moose just steals the show.  He is currently not available to order but not to worry...he will be back next year!  I know many people were so happy to hear that news.

The middle background is mostly from the Snow Front Stamp Set.  The snowman in the middle is my favorite. 

When I took the picture, the card was at an angle so you could see the inside panels.  The sentiment is like a bridge on the bottom.  This is a 3-D card, but lays flat to mail.  I've got to give this card style a try.

Until next time...Stampin' Always,

Cheryl, HomeStyle Stamper