You Are So Special

Tomorrow is the day!  New catalog goes live! I'm so excited.  There are so many items I have on my Wish List.  First off are the new 2020-2022 In-Color ink pads.  

I stamped the ferns in three different colors - Soft Seafoam, Garden Green and Pretty Peacock.   Somehow all the greens work together.  Wouldn't have paired them together.  

The DSP is the Forever Greenery DSP pack.   It's all the different greens together.  Including Just Jade, one of the new In-Colors.  The base of the card is actually Just Jade.  I'm liking it already.  I am excited to use this DSP with a pop of color.  Soon I will get to that. 

The ribbon is part of the Flowers for Every Season ribbon pack.  It's also in Just Jade! It was the perfect way to hide the seam between the papers.  In the ribbon pack, also comes a ribbon in Whisper White and a Misty Moonlight twine.  All three I can't wait to use.

Click on the above picture for dimensions and instructions.

Until next time...Stampin' Always,

Cheryl, HomeStyle Stamper

Product List


Cut Out Card

I finally had a Sunday off!!  And the weather was absolutely gorgeous.  I was one happy person today!  It was a great day to start some small projects.  Two years ago, I picked up a small chest that could be hung on a wall, set on the floor or a dresser.  It was one of those things I thought one of my girls could use when they eventually move out.  So, I started by sanding it down and getting it ready for primer.  I also painted a little shelf and spray painted a vase.  It felt good getting some of these projects started.

It's my last card using the Daisy Delight Stamp Set and Lily Impressions DSP.  The new catalog is just around the corner!

I tried another cut out window card today. The rectangle is cut right out from the card base.  There is a peek a boo piece of DSP looking through at you.  Take a look in the card inside.

The strip is just added so it's lined up in the middle of the rectangle.  I wove twine from the Nature's Twine pack through the window and around the card.  Just another unexpected detail in the card.

Just to clarify, the stamp set, Daisy Delight, is on the Retirement List.  But, the Daisy Punch is not!  So, don't get rid of it.  Go check out the stamp set that now works with the punch.  It might be on your Wish List.  

Click on the above picture for dimensions and instructions.

Until next time...Stampin' Always,

Cheryl, HomeStyle Stamper

tams# 45585

Product List


Mixing new with the old

The countdown has started!  Only 4 more days until the new catalog goes live!!  I'm super excited for it to start.  

But, in the meantime, we are saying good-bye to the 2018-2020 In-Colors.  They will soon  be gone forever.


While we are saying good-bye to the In-Colors, we are also saying good-bye to all the current DSP.  Included is the Tropical Oasis DSP.

I only have a sampler of the Tropical Oasis DSP, and I'm making the most of it.  It proves that if you like the DSP, don't be afraid of purchasing it without the coordinating stamp set.  

There are so many cards that I've seen that have the cardstock cut diagonally so I had to try it myself.  My card has multiple layers.  On the top is Tropical Oasis and Pretty Peacock, both cut on the diagonal.  The next layers are Crumb Cake then Whisper White.  The card base is Mint Macaron.

Tip:  When cutting a rectangle on the diagonal, start in the middle and cut outwards.  If you start on the outside, the paper trimmer might not give you a sharp corner.  

The sentiment is from Tasteful Touches Stamp Set.  I'm so loving this one.  It's cut out from the Tasteful Labels Dies.  Underneath is a mat of Pretty Peacock.  I adhered the Whisper White to the Pretty Peacock and trimmed around it with the paper snips.  I so wish this shape would come in two different sizes for that purpose.  

The last day to purchase from the Retirement List is June 2nd.  That's coming up super quick.  I'm so excited!!

Click on the above picture for dimensions and instructions.

Until next time...Stampin' Always,

Cheryl, HomeStyle Stamper

tams# 45524

Product List


Tasty Thursday - Easy Breakfast Granola Cups

I know it's been forever since I've posted a new recipe.  Now that things are calming down, sort of, I'm trying to get back in the hang of things.

Lately, breakfast has been a struggle for me.  I need to eat something before work, but nothing sounds good anymore.  I came across this recipe on Pinterest and actually tried it already.

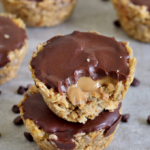
These granola cups were easy to put together.   It's also a no-bake recipe.  I didn't think twice, just immediately doubled the recipe.  Boy, was I happy I did.

My entire family said that I can make them again.  They really like them!  Basically, it's granola, peanut butter and chocolate.  What's not good about that combination?

Easy Breakfast Granola Cups

For the Granola Cups

  • 2 heaped tbsp sunflower-seed-butter
  • 1 ½ cups granola
  • 2 tbsp agave-syrup or maple-syrup
  • ½ cup sunflower-seeds chopped
  • pinch of salt

For the Filling

  • ¼ cup sunflower seed butter melted

For the Topping

  • ½ cup dairy-free chocolate-chips or dark-chocolate chopped

Instructions

  • Mix all ingredients to the granola-cups at a mixing-bowl and blend with a spoon or your hands. The mix should stick together when you press it between your palms. When it is not so sticky add a bit more liquid sweetener.

  • Grease a silicone mould or cupcake-pan. With the back of a tablespoon, press the mixture firmly to the cupcake-pan and create a dent in the center of every cup.

  • Place a heaped teaspoon of sunflower-seed-butter to the middle of every granola-cup. Freeze till firm for 60minutes.

  • Melt dairy-free chocolate-chips in a water tub (just set the chocolate chips in a small bowl and put it over hot-water). It's possible to hasten the melting process by incorporating 1-2 teaspoon of coconut-oil.

  • When the chocolate is melted pour it on top of the sunflower-seed-butter of every granola-cup. It’ll harden quickly as the sunflower seed butter is chilly.

  • Store in the refrigerator. You could even freeze these breakfast granola-cups in zip-lock-bags.

I used just regular peanut butter instead of the sunflower-seed butter.  Also, I substituted regular chopped peanuts for the sunflower seeds in the granola cup.  This was the first time I made them, so I didn't notice a difference on either substitution.

You can find the original recipe here: https://countsofthenetherworld.com/easy-breakfast-granola-cups-no-bake/

Until next time...Stampin' Always,

Cheryl, HomeStyle Stamper


Double Fold, Drop Down card

Blog Post Take 2.

This blog post was actually started last night.  It was almost done, just had to do the finishing touches.  Then WHAM!  I slid my fingers over the mouse and it deleted the entire post.  I just wanted to cry.  At 9:45 pm, I was just done.  It's not the first time it's happened, so you think I would have learned and saved it periodically, but NO.  Don't do the reasonable thing.  So, here it goes, again.

I actually created this card back in February, I think.  It was designed for my club, but we ran out of time to make this one.  So, we put it on hold for the next month.  Little did we know, things got a bit crazy.  We are hoping to meet in June and finally make this card.

So, this fun fold card design was found on Pinterest.  Naturally.  Lift the Whisper White up, to open the card.

Now you can see part of the inside, with the pop of DSP on the bottom.  Now, the bottom part folds down.

Finally, the entire inside of the card.  You have plenty of space to sign your name and even add a message.  It's a little bit unexpected and I think that's what drew me to this design. 

The stamp set used is Parisian Beauty and dies.  I was disappointed to see it on the Retirement List.  But, I was equally excited to see the Cherry Blossoms dies (and stamp set) were not retiring!  

Here's a closer look at the cherry blossoms.  I used a sponge dauber and the Petal Pink ink pad to shade the middle.  To make them more dimensional, I used the tip of the Take Your Pick Tool and a sponge mat.  I rubbed/circled the middle of the blossom with the capped end of the tool.  The blossoms ends came up without wrinkling the blossom. They are adhered with simple glue dots.  It was such a simple way to make a flower blossom more alive.  

Take 2.  Done.

Click on the above picture for dimensions and instructions.

Until next time...Stampin' Always,

Cheryl, HomeStyle Stamper

tams# 45342

Product List


The first Forever Fern Card

My Pre-order came the other day!  One perk of  being a demonstrator is getting purchase items before the catalog actually goes live.  There are so many items that are on my Wish List!  


Forever Fern is going to be a fun set to play with!  I love all the greens in the DSP.  In this card, I used:  Pretty Peacock, Mossy Meadow, Pear Pizzazz and Soft Sea Foam.  My only regret was that I don't have Just Jade ink pad yet.  I will definately be placing an order for all the new In-Color ink pads when the catalog goes life on June 3.  

 My first thought was that just about any color will pop with all these greens.  The paper is gorgeous.  Putting all the greens together isn't what people would normally do.  But, look, they work together.  

The gold twine is from the Forever Greenery Trim Combo Pack.  It comes with this gold trim and another Very Vanilla ribbon.  It resembles burlap, but a more refined kind.  I adhered it behind the sentiment by some old Washi Tape.  Use up that old tape that is just sitting in your craft room.  

Click on the above picture for dimensions and instructions.

Until next time...Stampin' Always,

Cheryl, HomeStyle Stamper

tams# 45234

Product List


Beautiful Life Card

Anyone watch Hell's Kitchen with Chef Ramsey?  Megan has been watching it and she  has hooked me in.  It's been an interesting watch.  The competition is definately fierce.  There are no friends, just frienemies.  Chef Ramsey's language is definately colorful.  He's loud and doesn't hold back.  

I'm making use of this sampler pack of DSP I got.  Sure wish SU! would offer this more often.  Here, the DSP is Best Dressed.  Some of that paper, I'm not a huge fan of, but this piece is beautiful.  

The strip of Old Olive is embossed with the Swirls & Curls embossing folder.  Unfortunately, it's not being carried over to the next catalog.  I'm disappointed it's not.  Grab it while it is available.

Metallic Edged Ribbon is Petal Pink.  Another item that's on the Retirement List.  I'm not doing so well in items staying current.  Guess I'll have to go on a spending spree!

Every single I in the sentiment is dotted with a pearl.  There are 4 of those.  If these pearls would ever retire, I would seriously be in bad shape.  You just can't go wrong with pearls.  Classic.

Click on the above picture for dimensions and instructions.

Until next time...Stampin' Always,

Cheryl, HomeStyle Stamper

Product List


Birthday Bonanza Time

What a dreary Sunday!  I checked my weather app this morning.  Usually, you don't see a forecast of 100% chance of rain.  And it was for quite a bit of the day.  It was pretty accurate since it did rain pretty much all day.  At least yesterday was gorgeous!  My husband got a bunch of outside stuff done while I worked all day.  But the burgers on the grill for dinner tasted awesome.  It's hard to resist those.

I went into work early today, and was super luck to get out early too.  Found some time to get into my stamp room.

I made this super cute and easy card while I was in my stamp room today.  Unfortunately, I don't own the stamp set that matches this DSP, but I didn't let that stop me.  

Layer two different patterns of the same DSP pack, matte the top one for definition.   Add a sentiment on a solid piece of cardstock so that stands out on it's own.  Easy peasy.  

The balloons are adhered to Bermuda Bay and then onto the Terra Cotta base.  Glad I finally got to use this color.  Hadn't used it much.  The character piece is adhere on Basic Black.  It needed a card color to ground it.  

The sentiment is used with the white embossing powder.  That alone steps up the card, especially when adhered with dimensionals.  I tried adding white baker's twine, but it actually didn't look good.  In this case, less was more.  

Click on the above picture for dimensions and instructions.

Until next time...Stampin' Always,

Cheryl, HomeStyle Stamper

tams# 45015

Product List