So Glad Christmas Gleaming is Back!!

What an horribly hot weekend.  One that I wish could have been spent at a beach with a tropcial breeze blowing.  Then, the temperature would have been tolerable.  I can dream, can't I?  A vacation is so overdue for everyone.

Are we ready for a Christmas card?  Too bad.  It's here.

I was super excited to hear Christmas Gleaming stamp set and the Brightly Gleaming DSP were coming back for another season!!!  I think this is one of my all time favorite DSP packs.  The colors with the hints of copper are out of this world!  


The color pallet is relatively simple for this one.  I wanted to use my Stampin' Blends but had to work with those that I had.  That being said, this  piece of DSP works perfectly.  The Night of Navy works with just about any color.   I used the Blends on three of the ornaments.  I tried to leave the middle with the least color.  


You may not recognize this sentiment yet.  It's from the new Joyful Holly stamp set.  It's currently in the Occassions Catalog and will be able for purchase August 4.  I wanted a sentiment stamped on an ornament for something new.  The ornament itself,  was way too bland so I stamped the ornament image and clear embossed it over the words.  It was exactly what I wanted.  

I stamped in the inside, but kept is simple.  Just now, I thought stamping one ornament in Real Red would have been a great way to bring it from the front to the inside.  Something for you to think about since mine is all adhered together.  

Click on the above picture for dimensions and instructions.

Until next time...Stampin' Always,

Cheryl, HomeStyle Stamper

tams# 47943

Product List


Copper Stampin' Emboss Powder


Three Tile Tin

It's going to be a hot weekend in Wisconsin!  Not especially looking forward to the weather, but the weekend...YAYAYAY!  I already made my list of what I want to get done.  I'm sure things will be added, but hopefully most will be completed.  One can hope, anyway.

This card was designed competely around this piece of Gold Foil.  I embossed it quite a while ago and never used it.  Somehow, I came across it and decided to put it to use.  It's no good just sitting there and I couldn't get myself to throw it away.

The gold foil is embossed with the Tin Tile 3D Embossing folder.  It really does look like an antique tin tile and I do love those.  The gold foil was cut after I embossed it.  This way, it was actually easier to trim off the excess.

The three Very Vanilla tiles are stamped from the Country Home Stamp Set.  After they were stamped, I trimmed them using my paper trimmer and paper snips.     

This is a classic design that is easily replicated.  Use a strip of paper, DSP or embossed, then center some accents on it.  

Click on the above picture for dimensins and instructions.

Until next time...Stampin' Always,

Cheryl, HomeStyle Stamper

Product List


Very Vanilla 5/8" Satin Ribbon


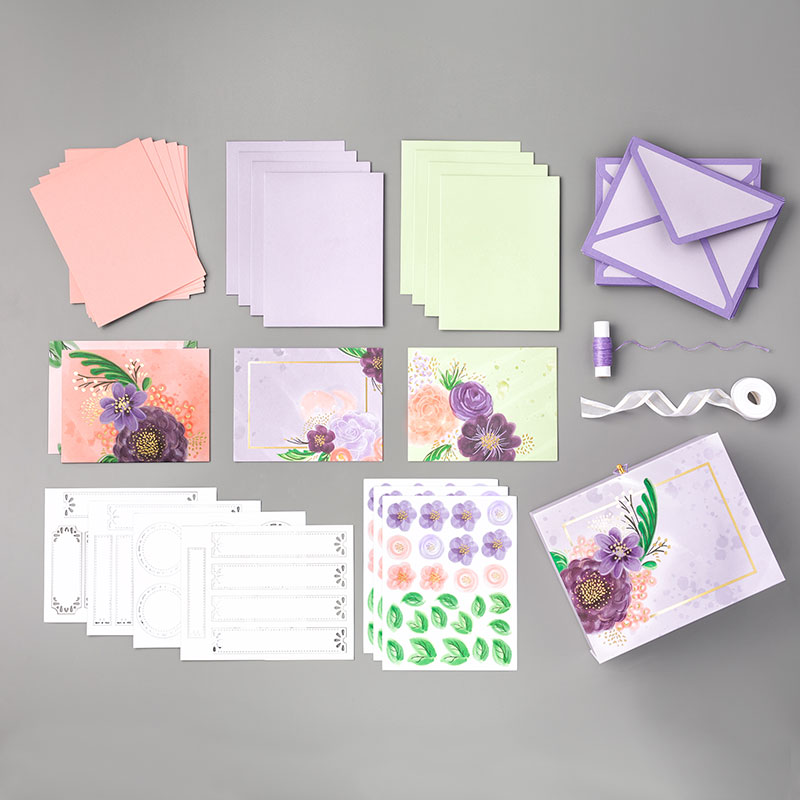
Gorgeous Posies Project Kit

Are you a Kit person or not?  I typically don't gravitate toward the kits or paper pumpkin, but there are some beautiful ones in the catalog.

One new kit is the Gorgeous Posies Project Kit.  I've seen it in person, and will say, it is ABSOLUTELY GORGEOUS! 


The sentiments are all stamped on cut-out from the kit.  Love the scalloped edging.  It really elevates how elegant the card can be.  Look at these flowers!  And they are printed right on the card!  

Never would I thought there was that many colors in this kit!  They packed a lot into this one.  


Unfortunately, this kit is not all-inclusive. There is a stamp set that does to specifically for this kit which is available to purchase separately.  It is very pretty, and the saying are sweet.  You would definately be able to use this stamp set on other projects, not just this kit. 

Also what is not included is ink pads, adhesive or dimensionals.  Definately can't get this kit done without those two items! 


This kit comes in the most beautiful box ever.  Almost too beautiful to give away.  It's in the purples with a flap lid including some flowers. 

Now, after taking a closer look at this kit, I'm going to ask you again.  Are you a kit person?

Until next time...Stampin' Always,

Cheryl, HomeStyle Stamper 


General Swap with Lovely You

For a day that was so super hot and humid, it turned out super nice.  The humidity left and we actually ate dinner on the back deck.  I made meatball subs.  They were pretty good.  We had spaghetti earlier this week so it was a perfect way to use up the rest of the sauce.  

So, I participated in a swap with some of my fellow demonstrators.  We always do it at this time because of the new catalog!  I signed up for general swap which meant...pretty much, anything goes.  

I chose to use the Lovely You stamp set.  The patterned paper is made from that stamp set.  I've grown to like making my own paper since purchasing this set.  Look at the colors I used:


At the last minute I added the Gray Granite into the mix.  The color palette needed a neutral color so I chose one that I typically don't use too much.  I always say, it's good to mix things up a bit!

The Seaside Spray layer is embossed with the Tasteful Textile 3D Embossing Folder.  Then, I sponged some Seaside Spray in random spots to bring out the texture.  It also grunged up the card a bit.  I like a little grunge.

Tomorrow, a friend is coming over and we working on some projects together.  Not stamping related but should be fun.   If I get something started and completed, I'll show you.

Click on the above picture for dimensions and instructions.

Until next time...Stampin' Always,

Cheryl, HomeStyle Stamper

tams# 47667

Product List


Forever Fern with shades of green

It's Hot Hot Hot outside here.  I hate it.  It's going to be this way for a while too.  Guess I won't be spending too much time outside.  My husband and Alyssa like the heat while Megan and I hate it.  Could we be more different?

I designed this card for club this week.  It's relatively simple, looks more complicated than it really is.  

Four stamps

Four colors

Take your pick which stamp goes with which color.  It's that easy.  

I stamped the sentiment and cut it out with the Stitched Nested Labels Dies.  It stands out more this way rather than just stamping on the Very Vanilla with the other images.

The card needed a little bit of something else, so I added the bow.  It's from the new Flowers for Every Season pack.  The checkered pattern is mostly Just Jade so it was perfect.

Tip:  Sometimes the Rococo Rose can be a little dark.  Stamp off before you stamp on the Very Vanilla for the card.

Click on the above picture for dimensions and instructions.

Until next time...Stampin' Always,

Cheryl, HomeStyle Stamper

Product List


Tasty Thursday - Tennessee Peach Pudding

July in this household means  PEACH SEASON!  We love our peaches.  

There is a company that comes and delivers fresh Georgia peaches twice a year.  I always get a box of peaches.  They are fabulous every year.  

We do love our peach cobbler.  I make at least one every year.  This year, I tried something new.  (I did make a cobbler though.)  It's very similar to a cobbler.   The top is more liquid than a cobbler.  When baked, it turns out somewhat crusty and the edges are gooey and crunchy.  In other words...yummy.

Tennessee Peach Pudding

  • Filling:
  • 5 cups peaches, peeled and diced, fresh or frozen
  • 2 cups all-purpose flour
  • 1 cup sugar
  • 1 cup whole milk
  • 4 teaspoons baking powder
  • 1 teaspoon sea salt
  • 1 teaspoon cinnamon
  • 1 teaspoon vanilla extract
  • 1/4 teaspoon nutmeg
  • Topping:
  • 3/4 cup brown sugar
  • 3/4 cup sugar
  • 3 tablespoons unsalted butter
  • 3 cups water
  • 1/2 teaspoon nutmeg
  • ice cream/whipped cream/cool whip, optional, garnish
  1. Preheat oven to 400º F and lightly grease a 9x13-inch baking dish with butter or non-stick spray.
  2. In a large saucepan over medium heat, whisk together brown sugar, sugar and nutmeg, then mix in butter and water and bring to a boil, stirring until sugar is fully dissolved.
  3. Remove from heat and set aside.
  4. In a large bowl, whisk together flour, sugar, baking powder, salt, cinnamon and nutmeg until combined.
  5. Whisk in milk and vanilla extract until smooth, then fold in diced peaches.
  6. Pour filling into greased baking dish, then pour topping on top.
  7. Place in oven and bake for 50-55 minutes, covering with aluminum foil, if necessary, until cooked through.
  8. Remove from oven and let cool 15 minutes before serving.

I would definately recommend serving this with cool whip or even ice cream.  It needed something to cut the sweetness, but it was wonderful.  My family loved it and would want it again.  

Here is where I found the recipe if you want to read the blog.  Tennessee Peach Pudding

Until next time...Stampin' Always,

Cheryl, HomeStyle Stamper

New In-Color coordination

New In-Colors.  They are always excited to see the new colors we have to play with for two years.  It can also be super intimidating.  

There is always a time for adjustment.  Just now, am I finally getting used to the colors and really liking them. 

Stampin' Up! has made Color Coaches for every color.  This does include the new In-Colors.  I refer to them quite often, especially when new colors are introduced.  Here is one Stampin' Up! provided for everyone.

Isn't this less intimidating?  I think these Color Coaches are a fabulous tool for everyone.  The decision of which color goes with which is done for us.  It's such a time saving tool.  I'm always wondering if the colors I chose actually look good together.  When I see them on a color Coach, I feel so much better.

Don't forget in the month of July is Bonus Days.  For every $50 spent in product, you receive a $5 Bonus Code to redeem in August.  If you were thinking about placing an order, now might be the time.  There is no limit to the number of codes you can earn, either in a single order, or multiple orders throughout the month.  Yahoo!

It's like getting a coupon for the best crafting supplies you can find.  

Until next time...Stampin' Always,

Cheryl, HomeStyle Stamper


Just Saying Hello...Again

Are you ready for another week?  I only have to work 2 days this week!!! It has already made my week.  Unfortunately, the paycheck reflects the hours I've been working.  But, that's ok.  I have a feeling things will be changing in the fall.  

I LOVE this stamp set, Tasteful Touches.  The feather, greens, and flower are just beautiful.  I wouldn't have necessarily thought to put these three images in a stamp set, but I'm so very glad they did.  

The colors chosen were off of a color coach I found on Pinterest.  Never would I put those three together, but look what happened.  They look fabulous together. 


Sorry, people, but unless you have another means, the images have to be fussy cut out.  But they look so good this way.  The sentiment is on a shape from the Tasteful Labels Dies.  

The paper is the In Good Taste DSP.  It's all real life images.  It's so cool.  This paper is looking like stacked stone.  I watch enough HGTV to recognize it.  Sad, right?

What's your favorite thing about the card?  Let me know!  Is it the color(s)?  Stamps? Paper?  

Click on the above picture for dimensions and instructions.

Until next time...Stampin' Always,

Cheryl, HomeStyle Stamper

tams# 47397

Product List