Happy Birthday with Circle Sayings Stamp Set

I  was so excited to get our new living room furniture yesterday!  We splurged and got new carpeting first.  In years past, we've gotten new furniture here and there, making everything look ok.  This time we got it all new!  Couch, loveseat, and all the tables.  Next, I had to look for new lamps.  We have skinny lamps currently, and the tables are larger so they look even smaller.  They will be fine until I can find something we like.  Progress in small steps.

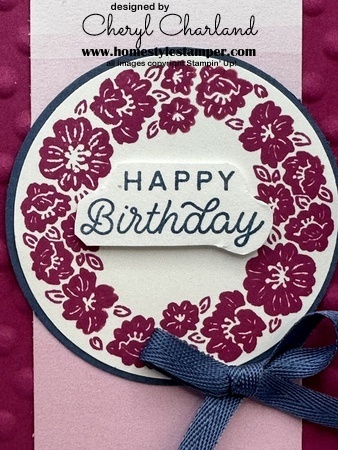
These were my club Thank you Cards this month.  I was excited to use the Circle Sayings stamp set and the coordinating punch.  The floral wreath is only half sided.  Turn your paper around and if you stamp correctly, no one will know it's not a circle.  

For the sentiment, I stamped on scrap Basic White and used my paper snips to do a rough cut around the words.  Then it's adhered with dimensions.  This fussy cutting anyone can handle!  

The ribbon I used was from several years ago when Misty Moonlight was an In-Color.  Never thought it would come back, so I might as well use it up.  So, use which ever ribbon you have that would look good.  

For the inside, I stamped and colored the adorable cupcake.  It's a birthday card and everyone one likes cupcakes!  I colored mine with the Stampin' Blends, but you can us the regular Stampin' Write markers if you prefer.

Click on the above picture for dimensions and instructions.

Until next time...Stampin' Always,

Cheryl, HomeStyle Stamper

Product List


Awesome Circle Sayings Card

It happened to be City Wide Rummage Sale this weekend.  Weather wise, it was absolutely perfect.  Mostly in the 70s, sunny and no rain!  Usually it's with rainy or super hot.  This year we were up against graduation parties.  The number of people was lower and we think that was the reason why.  Oh well.  There's always another time.

This card actually was inspired by the Bright & Beautiful DSP scrap you see on the card.  It was just sitting there and I hate to throw scraps away, especially big ones like this.  

This was the first time I was able to use the Circle Sayings stamp set.  I can tell it's going to be a favorite because there are so many things you can do with it.  Plus, the cupcake is absolutely adorable!

I am in LOVE with this color combo.  Orchid Oasis and Lemon Lime Twist.  Together they are eye catching and make a statement.

For the Lemon Lime Twist circle, I used the 2 1/2 inch circle punch.  If you don't have it, use any other circle that would work.  Don't forget to check your dies.  For this rea son, I won't give up my circle dies.  You just don't know when yo will need a circle.  Also, don't get rid of those pearls that just retired.  I colored mine using the Light Orchid Oasis Blends marker and they look fabulous!  

Simple is great for the inside.  I don't remember what stamp set the "Happy Birthday" came from, but it's size works better than the one that is on the Circle Sayings stamp set.  

Click on the above picture for dimensions and instructions.

Until next time...Stampin' Always,

Cheryl, HomeStyle Stamper

Product List


2-1/2" Circle Punch
2-1/2" Circle Punch
[120906]


Simple Daisy Card

It's definitely been a crazy couple of weeks.  This weekend is Citywide Rummage Sale.  I'm dong a sale at my friend's house and my husband is having a small one oat our house.  We are getting all new living room furniture so we are trying to get rid of the old.  By having it here, we don't have to haul the furniture anywhere. Bonus!  Let's hope it all goes.

I finally got to use the Cheerful Daisy stamp set and made this easy card.  The background DSP is all done for you in the Fresh as a Daisy DSP pack.  This means the only stamping I did on this card was the sentiment.

I cut out three daisies, one large and two smaller.  Make sure you use the adhesive sheets when cutting out the actual daisy.  Also use them on the "stems" for the lack of a better word.  Actually, I have no idea what the other piece I cut out, but it does add something to the card.  If you know what to call it, please let me know.  I'm super curious.

The background and the "stems" is Wild Wheat.  It is my first time using this color.  It's a color I'm going to have to get used to.  I don't dislike it, but it has to grow on me.  Does that make sense?  

I didn't do my usual directions because this card is so easy.  But, below you will see all the supplies used.  

Until next time...Stampin' Always,

Cheryl, HomeStyle Stamper

Product List


Father's Day Card

It's been a crazy few weeks around here.  Memorial Day weekend was no better.  Alyssa and I finally made it to the Madison Farmer's Market.  We were especially excited to find the fres herb plants.  The tomatoes I found made fabulous salsa.  Sunday was Megan's birthday, so after moving furniture around, we celebrated her.  Overall, busy but fun weekend.

It's my first card using the new Copper Clay.  Unfortunately it does pair nicely with the retired Sahara Sand.  

The sentiment is stamped in Copper Clay.  There is a die to cut out the sentiment, but not the Copper Clay piece.  To get the rounded corners, use the paper snips and cut them yourself.  It was really easy and looked better than a true rectangle.  It was worth the time. 

Sahara Sand is embossed with one of the Basic 3D embossing folders.  It is sold as a pack of three.  I love the nondescript pattern in this folder.  I've been using it a lot lately.

For the inside, I chose the Father's Day sentiment.  It is also perfect for a birthday card.  Just switch the sentiment.  I do love these photo corners.  I wish there was a die for those as well.  

Click on the above picture for dimensions and instructions.

Until next time...Stampin' Always,

Cheryl, HomeStyle Stamper

Product List
 

3/4" (1.9 Cm) Circle Punch
[119873]
1-1/4" Burlap Ribbon
[132140]


Cute Ladybug

What a weekend.  We helped Alyssa move to a new apartment.  The weather actually cooperated for a change.  Usually moving days are super hot and humid.  This time it was perfect.  Today I spent it outside spreading 56 bags of mulch.  I am thinking work tomorrow should be relaxing.  

I really do like this little ladybug.  Who couldn't?  Since it is almost summer, it was time for her to make an appearance.  

She was really easy to make.  Punch out the body from Basic Black.  The wings are stamped in Sweet Sorbet and Memento.  Punch out and adhere directly to the body. 


I didn't do too bad with the two-step stamping!  And I did it without the Stamparatus.  

The leaves are stamped in Lemon Lime Twist.  It is the first time since the Color Refresh that I have used it.  Knowing it was so popular as an In-Color, I wasn't surprised it came back.  Looks great with the sweet Sorbet.


If you thought the other ladybug was cute, take a look at this one!  She's got her eye on you!  This one is my favorite.  Unlike the front ladybug, this one is completely stamped.  Again, I was impressed with my two-step stamping.  She turned out almost perfect.  

These cards were my Thank You cards for my Club's April orders.  I did good on every single card.  I didn't have to re-stamp a single card.  It has to be a first for me!   

Click on the above picture for dimensions and instructions.

Until next time...Stampin' Always,

Cheryl, HomeStyle Stamper

Product List


Simple Stamping Birthday Card

Finally some fabulous weather is here!  I haven't even minded watering the outside flowers at work this week.  Because of Mother's Day coming up, I've been helping out the floral department.  I've been doing the grunt work which isn't super fun, but necessary.  It's more money for the vacation fund.

Here is a super simple card for any birthday.  It was fun using new colors!  I'm really liking the Lemon Lolly cardstock.  It's so bright and cheerful.  Pairs great with Misty Moonlight.

The strip of paper is from the Bright & Beautiful DSP pack.  I'm not sure about the exact width used, but I just cut down the rows apart.  It was a great way to use up a lot of scraps if you have them.  In my case, there was no scraps because I just opened the pack.  

I was torn between using Misty Moonlight or Lost Lagoon.  My husband chose for me.  In his eyes, the greenish color and yellow always reminds him of the Green Bay Packers.  Go figure.  

I used some retired metallic pearls on this card, but rhinestones would work too.  In fact, if you don't like all the blank space, scatter some rhinestones around instead of the upper corner.  I may have to try that on the next card.

Click on the above picture for dimensions and instructions.

Until next time...Stampin' Always,

Cheryl, HomeStyle Stamper

Product List


He's All That Birthday Card

Are you ready for a new catalog?  I am!!  

The new colors are going to be so fun to play with.   Azure Afternoon and Boho Blue were the two that really intrigued me the most.   Unfortunately, I haven't had much time lately to spend in my stamp room. On Wednesday I should be getting another package from SU! and it will include two new stamp sets.  I'm so excited to get some new stamps! 

This set, He's All That, is not retiring!  I'm so happy since this is the only masculine set that I own. 

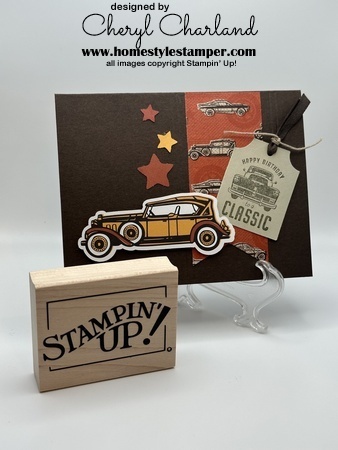
The DSP, He's All That, is retiring.  The card was a cut-out from the DSP pack.  There was a whole sheet of cut-out that coordinated with the stamps.  Beautiful idea.  I could't stamp or color the car so good.  The only image I stamped was the sentiment on the Sahara Sand tag.  I made sure you could see the card in the DSP.

It does not show up much at all, but on either side of the DSP, I scored two lines with the Simply Scored.  It was just a detail, instead of using an embossing folder.  Randomly score two lines on each side and that is all.  

Also, the stars were part of the cut-out pack.  And there were two different sizes.  We need more of this kind!

Instead of stamping an image on the inside, I used up another scrap of the DSP.  It's better than throwing away scraps.  Besides, do guys really notice the inside?  Probably not.

Click on the above picture for dimensions and instructions.

Until next time...Stampin' Always,

Cheryl, HomeStyle Stamper

tams# 80524

Product List


Say Farewell to Bermuda Bay & Blessings of Home Stamp Set

I had a fun weekend crafting.  My friend and I went to a local hotel with about 25 other people and crafted all weekend long.  With the Color Refresh and new In-Colors coming, I had to make more of my color swatches. Glad to get them almost done.  I also worked on my Italy scrapbook some more.  Maybe some year I'll get that one done.

We made this birthday card in club this month.  It's a pretty simple card which is nice.  We had other cards that required more time than this one did.  

It was also a way to say good-bye to Blessings of Home stamp set, So Saffron and Bermuda Bay.  It will be sad to see all three leave us.  I was especially surprised to see So Saffron on the Retirement List.  SU! does know how to surprise us.

I used the Basics 3D Embossing Folders.  They are only available online, so don't worry if you don't see them in the new catty.  There is no date as to when these online exclusive will come to an end.  I am so glad to have purchased them.  So many times I need a neutral, subtle texture and these are perfect.  Take a peek at them.

It's very hard to see, but I colored the largest flower with the Wink of Stella.  And because there are flowers, I couldn't resist these bumblebee trinkets.  Plus, they make me smile.

Click on the above picture for dimensions and instructions.

Until next time...Stampin' Always,

Cheryl, HomeStyle Stamper

Product List